Tutorials
How To Make A Big Trance Arp Lead
This is a tutorial that shows you how to build a trance arp lead. An arp (or arpeggio) in trance music is typically a fast paced melody playing the notes from a chord progression in a specific sequence (or pattern), rather than simultaneously. For any given chord progression, many different patterns can potentially be created, resulting in different sounding arpeggios.
Arpeggios might not be used as much nowadays as they used to be, but they still play a key role in many trance productions, especially in uplifting trance.
If you don’t have much (or any) musical training, it might not be easy for you to create trance melodies that make sense and fit together. If you learn the basic techniques for building a trance melody, you can work much faster and then spend more time experimenting with various patterns or variations. We used this technique when we had to create 100 trance melodies for our Definitive Uplifting Trance MIDI Pack.
Read the tutorial below to find out how I built a trance arpeggio that plays along an existing chord progression.
0) What You Will Learn :
- How to build a trance arp (or arpeggio) based on a specific chord progression
- At the bottom of this page, you can download the MIDI files from this tutorial and the Project File for Ableton Live.
Before going any further, remember that there are no rules in making music. Everything that follows are simple guidelines that are based on my own experience. This is intended to help you make your own melodies, but there are of course many other ways to come up with melodies for your tracks. This is just one of them 🙂
1) Trance arp : The Full Audio Example
First of all, let’s listen to the final result. The arpeggio comes in during the second section of this audio demo. This is what you will get in the project file you will be able to download at the end of this tutorial.
2) Start off with a chord sequence
A chord sequence (or chord progression) is a series of chords. A chord is simply several notes playing at the same time. Think of the chord sequence as the melodic backbone of your track. It can be 4, 6, 8, sometimes 16 bars long, this is entirely up to you. Each chord can play for 1/2, 1, 2 or more bars, once again this is up to you to decide.
After years of practice, one thing has become clear to me : making melodies for your track is a lot easier if you already have chosen a chord sequence for your track (and this is true in most genres, not just trance). If you have your chord progression figured out, you can simply draw melodies that follow those chord sequences (at every bar, you know which notes you can or cannot play because the chord progression acts as a guideline for your melody). This is why I recommend that you start off with an existing chord sequence before making melodies.
Once again, if you don’t have any musical training, building a chord progression from scratch is not an easy task, so I will be writing another tutorial very soon on creating good chord sequences. For the purpose of this tutorial, we created an epic sounding chord sequence inspired by an orchestral score from a french movie called “Les Visiteurs”.
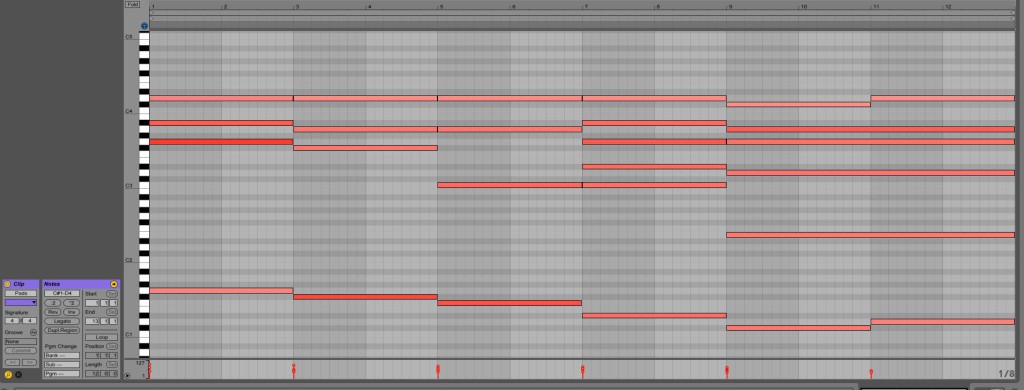
What the chord sequence looks like :
As you can see, this chord progression spans over 12 bars and contains 6 different chord changes, each one lasting 2 bars. Below you can hear what it sounds like, played using a pad (or string) preset from the Native Instruments Massive synthesizer.
What it sounds like :
In our demonstration, we also added a pluck sound (using NI Massive as well) that compliments our pads / strings. Here’s how it sounds like when playing alone :
3) Copy the chords into your arpeggio channel
What I did first : I copied the whole chord progression from the pad channel into the arpeggio channel. This gives me the notes that I can play with for each chord in the progression, and I know those notes will be in tune.
4) Choose a pattern for your trance arp
I like to think of a melody as a combination of a pattern and note changes. The pattern is how the notes are places horizontally on your piano roll, giving the rhythm to the melody. The note changes are how the notes are placed vertically, making the whole thing melodic. Then of course, your melody should be following the chord changes in your chord progression.
I first decided to choose a simple pattern playing 16th notes (1 note playing every 1/4th of a step) which gives us a fast paced rhythm. I started by drawing all these notes in the piano roll. Here’s what it looks like :
5) Move all notes into the chords
This is where your pattern becomes a trance arp. This step is where you could create very different sounding patterns, resulting in different arpeggios. What I did here is just one example.
You’re going to move all notes from your pattern into the chord notes (in the end, you want all the long notes to be removed). I chose a pattern lasting 1 step, starting with one of the lowest notes in the chord, then going up, up again and down. Here’s what it looks like :
6) Layering & Automation
The last steps were simply adding some filter automation on the arpeggio layers, so the filter opens up progressively within the first 6 bars and then closes back down. I also fixed the levels of each separate channel so that the arpeggio cuts through the mix without being too loud. Here’s how the final arpegio layers sound when played by themselves :
7) The Result
Below you can listen to the final result. First, the pad and pluck channels playing alone, then the trance arp lead comes in, making the whole piece uplifting and energetic. This would typically be the breakdown part of a trance production.
8) Download the Ableton Live Project File from this tutorial
You can download the Ableton Live Project using the button below. This is 100% Royalty Free content and can be used for learning or as a basis for your own tracks.
If you are looking for more inspiration, you might also want to check out our Definitive Uplifting Trance MIDI Pack which contains 100 MIDI construction kits made specifically for uplifting trance. We have worked VERY hard on this pack and included an insane amount of interesting chord sequences, melodies and trance arps in there.
9) Conclusion
I hope you enjoyed this step-by-step guide to creating a trance arp. Do you use the same technique when making your own arpeggios ? Leave a comment and let us know 🙂
Feel free to sign up to our newsletter if you want to receive more tutorials and free content in the near future.


11 Comments
Aaron
Nice tutorial, hardest part is coming up with the good chord progressions and patterns
Dennis Pedersen
I absolutely agree. Even though i might be a signed producer. this is what i struggle with the most!
Jonathan Blakoe
We will most likely be posting tips & tutorials on this too ! 🙂
aarym
Look forward to that, although I can only imagine going through music theory to different levels of competency will be challenging to say the least 🙂
Raul Alfredo Martínez
This is amazing! I really love the sound and mostly the simplicity of how you explained it!
Thanks!
Pete_Pagan
Great tutorial Jonathan! Thanks.
I have always been fascinated with arpeggios for Trance music. Especially sentimental cords that bring strong emotion. Being a piano player for +30 years .., cords come to me fairly easy. For those who need help thinking of chords… Try using a plugin called Cthulhu from Xfer records. 7 aliens Catanya is also a great plugin to help generate amazing arps.
I take my midi presets from many of MyLoops sample set and combine them or shuffle them around to get good variations then play them through an arp plugin.
Great stuff!!!! 🙂
rohit aggarwal
thanks for the information
varun gupta
good one keep it up
Deepak Kumar
thanks for sharing this tips
Torbjörn Markusson
Seriously,,, your audio isn’t working
Jonathan Blakoe
Sorry about that, it’s fixed now!